Saturday, October 20, 2012

Need Adjustment / Settings for Canon iP90 IF getting Message 5C00

Knowledge is power, here is the knowledge, the formatting is a little messy but it follows okay, ther are TWO distinct steps to resetting the TWO ink counters in aan iP90. Enjoy.

3-3. Adjustment / Settings

(1) Service mode
The basic operations are the same as those of the i70 / PIXUS 50i.
In this section, destination settings, how to reset the waste ink counter, and EEPROM information
printing, which differ from those of the i70 / PIXUS 50i, are detailed.

1) Turn off a printer. While pressing the Resume/Cancel button, press the Power button.
The LED lights green to indicate that functions are selectable.

2) While holding the Power button, release the Resume/Cancel button. (Do not release the Power
button.)

3) While holding the Power button, press the Resume/Cancel button 3 times, and then release the
Power and Resume/Cancel buttons. (Each time the Resume/Cancel button is pressed, the LED
alternately lights in either orange or green, starting with orange.)

4) When the LED lights green, press the Resume/Cancel button as many times as you need, to
select the preferred function. (See the table below.) Each time the Resume/Cancel button is
pressed, the LED alternately lights in either orange or green, starting with orange.
(The color red indicates the changes from the i70 / PIXUS 50i.)

Time(s) LED Function Remarks

0 times Green Power off When the print head is not installed, the carriage
returns and locks in the home position.
1 time Orange Service test print
2 times Green EEPROM information print
3 times Orange EEPROM initialization
4 times Green Waste ink counter resetting Proceed to step 5) below. Once executing step 5), then, move on to step 6) to select the waste ink counter to be reset. (Different from the i70 /
PIXUS 50i.)
5 times Orange Destination settings Proceed to step 5) below. Once executing step 5), then, move on to step 7) to select a
destination. (Different from the i70 / PIXUS 50i.)
10 times Green Return to the menu selection

5) After the function (menu) is selected, press the Power button. The LED lights green, and the
selected function will be performed. (When the operation completes, the printer returns to the
menu selection mode automatically.)


6) Press the Resume/Cancel button the specified number of time(s), then press the Power button.
Time(s) LED Waste ink counter to be reset

0 time Green Main waste ink counter
1 times Orange Platen waste ink counter
2 times Green Main waste ink counter and platen waste ink counter (at the
same time)
Note: When the waste ink counter is reset, print the EEPROM information as shown below,
and confirm that the value of the counter is 0 %.

8


7) Press the Resume/Cancel button the specified number of time(s) according to the destination
listed in the table below, then press the Power button.
Time(s) LED Destination
1 time Orange Japan: PIXUS iP90
2 times Green Other than Japan (A4): PIXMA iP90
3 times Orange Other than Japan (LTR): PIXMA iP90 (LTR)
Note: After the specific destination is set, print the EEPROM information as shown below, and
confirm the model name.


Print sample:
1:iPXXXX 2:V1.02 3:IF(USB=1) 4:D=004.9 PD=000.0 5:ST=2005/09/27-18:30
6:ER(ER0=1000 ER1=5100) 7:LPT=2005/09/028-09:09 8:PC(M=002 R=000 T=001 D=009 C=009)
9:CLT(BK=2005/09/27-18:30 Cl=2005/09/27-18:30) 10:CH=00002 11:CT(BK=040 CL=013)
12:IS(BK=1 C=0 M=1 Y=1) 13:IC(BK=00000 C=00000 M=00000 Y=00000)
14:Power(SON=00009 SOFF=00009)
15:REG=0 16:UR(A(BKoe)=+01 B(Coe)=-01 C(Moe)=+01 D(SCoe)=-01 E(SMoe)=+01 F(BKbi)=+01
G(CLbi)=+01 H(BK-CL)=+01 I(SCLbi)=+01 J(C-SC)=+01 K(M-SM)=+01)
17:WP=0024 18:CDIN(LG=001 PB=000) 19:MSD(015)
20: PAGE(All=00083 PP=00035 HR+MP=00003 PR+SP+SG=00003 GP=00000 PC=00000 ENV=00000)
21:CDPAGE=00003 IRPAGE=00003 BTPAGE=00003 PBPAGE=00000 22:BAT PAGE=00000
23:EDGE=00083 24:L=00000 25:HEAD Temp=30.0 26:Env Temp=30.0 27:FF(3F 3F 3F)
HDEEPROM
1:V0001 2:SN=0000-3D6B 3:LN(00000 00000 000001 000003 00001 00000 00000) 4:ID=00
5:IL=(BK=000 C=+01 M=000 Y=+01 C2=+01 M2=000 Y2=+01)

Printed items:
1. Model name 2. ROM version 3. Connected I/F (USB1) 4. Main waste ink amount, Platen waste ink amount
5. Installation date 6. Operator call/service call error record 7. Last printing time 8. Purging count
(manual/deep/timer/dot count/print head installation and removal/ink tank installation and removal)
9. Cleaning time 10. Print head installation and removal (change print head) count 11. Ink tank installation and
removal (change ink tanks) count (Bk/CL) 12. Ink status (Bk/C/M/Y) 13. Total ink consumption 14. Power-on
count (soft power on/soft power off/hard power on) 15. Print head alignment implementation 16. User print head
alignment values (Bkoe/Coe/Moe/SCoe/SMoe/BKbi/CLbi/BK-CL/SCLbi/C-SC/M-SM) 17. Number of times of wiping
18. Number of times of camera port connection and removal (Legacy, PB) 19. Number of the maximum printing
intermission in days 20. Number of print pages (total/plain paper/high resolution paper + Matte Photo Paper/Photo
Paper Pro + Photo Paper Plus Glossy + Photo Paper Plus Semi-gloss/Glossy Photo Paper/Card/Envelope) 21.
Number of Camera Direct Print pages (total), number of IRDA print pages (total), number of Bluetooth print pages
(total), and number of Print Beam print pages (total) 22. Number of print pages using battery (total) 23. Number of
borderless print pages 24. Number of print page (L/4” x 6”) 25. Print head temperature 26. Inside temperature
27. Line inspection information

HDEEPROM
1. Version
2. Serial number
3. Lot number
4. Print head ID
5. Ink ejection level (Bk/C/M/Y)
Read More..

Service Error Message 5C00 Canon iP90

1) Close the print head cover, and turn off the printer. While pressing the Resume/Cancel button, press the Power button. (Do not release the buttons. The LED lights in green to indicate that a function is selectable.)

2) While holding the Power button, release the Resume/Cancel button. (Do not release the Power button.)

3) While holding the Power button, press the Resume/Cancel button three times, and then release the Power and Resume/Cancel buttons. (Each time the Resume/Cancel button is pressed, the LED lights alternately in either orange or green, starting with orange.) During initialization, the LED blinks in green.

4) When the LED stops blinking and lights in green, press the Resume/Cancel button the 4 times. (Each time the Resume/Cancel button is pressed, the LED lights alternately in either orange or green, starting with orange.)

5) Press the Power button. The LED lights in green, and the selected function is performed. (When the operation completes, the printer returns to the menu selection mode automatically.)

6) Power off then back on and test.

thx to barney
Read More..

this is how to Reset Canon MP520

First thx to BilBg, this is how to Reset Canon MP520 First look at photo:
(red colored numbers 1...4 added by me)

I refill cartridges for inkjet printers for about 12 years (since 1996).
One of my customers found this procedure for resetting the Canon Pixma MP520
by experimenting with different button combinations.

(by his words long (10-15 sec.) pressing of just one (any) button doesn't work -
for many Canon Pixma models pressing the PaperEject, Cancel or OK button for 10 sec.
resets the ink level or ignores it)


Procedure:

a) Switch the printer OFF
b) Press buttons 1 + 2 + 3 and 4 (simultaneously using four fingers)
c) Keep pressing this four buttons for 10 seconds
d) Release the On/Off button (number 4) (Keeping pressing the others)
e) After a few seconds (when the printer go ON) you can release buttons 1, 2, 3

Notes:

1. Maybe step "c)" is not needed
2. This procedure was used when I refilled the Black cartridge -
try using the ColorCopy button instead of BlackCopy button (number 1)
if you refill Color cartridge.
3. Maybe there is no need for all the four buttons -
you can try 1 + 4, 2 + 4 or 3 + 4.
(or 1+2+4, 1+3+4, 2+3+4)

Best wishes from Varna, Bulgaria
Read More..

If you got Fatal Error On Epson

A fatal error is basically caused by any of the following conditions: -The printer does not detect the carriage in the home position. -The printer does not detect signals from the linear scale. -The ASF sensor does not detect the ASF home position. PROBLEM When the Printer is powered on:
• The CR unit moves in the capping area.(CR unit is fixed with CR lock lever.)
• The CR unit moves and strikes the left frame because it is not fixed with the CR lock. After that, the Panel LED indicates the Fatal Error. FIX Check the CR Encorder sensor board visually.
 • In case the CR Encorder sensor board is not mounted in the sensor mounting position, mount it in the CR mounted position securely.
• In case the CR Encorder FFC is disconnected from the connector on the CR Encorder sensor board, connect it securely. Also check that the sensor is free from dust and paper debris.
Read More..

Waste Ink Tube & Bottle?

Waste Ink Tube & Bottle?
Epson printer generates waste ink which is directed into absorbent pads in the base of the printer. Eventually waste ink pads will fill up and need to be replaced.

Alternatively, you can install a tube and bottle behind the printer and direct all waste ink into an external waste ink bottle.

The following pictures can give you some more idea. Procedures may vary upon different models.


 this IMG, procedure from inkrepublic.com source here
Read More..

Download Epson Waste Reset Utility

hi guys if you need resetter for Epson printer download here The maintenance request error is actually a Waste Ink Ink Pad Error and normally your remedy is to replace the Waste Ink Pad/Pads with a new one/ones and then reset the Internal Waste Ink Pad Counter. If you just reset the counter and don't replace the pads, then your printers old pads will eventually overflow and normally start leaking ink out the bottom of your printer.

Some people actually wash the ink out of the old pads, by holding them under running cold water, then dry them out and simply reinstall them back into their printer. The choice on what to actually do, is yours to make. I would at least recommend getting that Waste Ink Counter reset procedure and performing it first, to make sure your printer will then work.
Read More..

Saturday, September 1, 2012

Privacy

If you require any more information or have any questions about our privacy policy, please feel free to contact us by email at goreset@aol.com.

At www.goreset.blogspot.com, the privacy of our visitors is of extreme importance to us. This privacy policy document outlines the types of personal information is received and collected by www.goreset.blogspot.com and how it is used.

Log Files
Like many other Web sites, www.goreset.blogspot.com makes use of log files. The information inside the log files includes internet protocol ( IP ) addresses, type of browser, Internet Service Provider ( ISP ), date/time stamp, referring/exit pages, and number of clicks to analyze trends, administer the site, track user’s movement around the site, and gather demographic information. IP addresses, and other such information are not linked to any information that is personally identifiable.

Cookies and Web Beacons
www.goreset.blogspot.com does use cookies to store information about visitors preferences, record user-specific information on which pages the user access or visit, customize Web page content based on visitors browser type or other information that the visitor sends via their browser.

DoubleClick DART Cookie
.:: Google, as a third party vendor, uses cookies to serve ads on www.goreset.blogspot.com.
.:: Google's use of the DART cookie enables it to serve ads to users based on their visit to www.goreset.blogspot.com and other sites on the Internet.
.:: Users may opt out of the use of the DART cookie by visiting the Google ad and content network privacy policy at the following URL - http://www.google.com/privacy_ads.html

Some of our advertising partners may use cookies and web beacons on our site. Our advertising partners include ....
Google Adsense

Infolinks

These third-party ad servers or ad networks use technology to the advertisements and links that appear on www.goreset.blogspot.com send directly to your browsers. They automatically receive your IP address when this occurs. Other technologies ( such as cookies, JavaScript, or Web Beacons ) may also be used by the third-party ad networks to measure the effectiveness of their advertisements and / or to personalize the advertising content that you see.

www.goreset.blogspot.com has no access to or control over these cookies that are used by third-party advertisers.

You should consult the respective privacy policies of these third-party ad servers for more detailed information on their practices as well as for instructions about how to opt-out of certain practices. www.goreset.blogspot.com's privacy policy does not apply to, and we cannot control the activities of, such other advertisers or web sites.

If you wish to disable cookies, you may do so through your individual browser options. More detailed information about cookie management with specific web browsers can be found at the browsers' respective websites.
Read More..

Thursday, July 5, 2012

Lexmark Using Inkjet Cartridge Chips AND Spyware?

The low ink indication is triggered by hardware within the ink cartridge. The ink cartridges have unique hardware identification numbers assigned to them and when that number changes, the unit knows that a new ink cartridge has been installed and resets the ink counters however since the cartidge has already been recognized by the printer it must be manually reset.

Typically the printer remembers up to 2 ID numbers and on the 3rd cartridge it will disregard the 1st cartridge you inserted. So rotating cartridges is the best solution for resetting the printer.

Resetting in this manner requires three cartridges.
Label the top of each cartridge with a letter. As an example A B C.

1. "A" is in the printer (printer knows "A")
2. "A" is removed and replaced with "B" (printer knows "A" & "B")
3. "B" is removed and replaced with "C" (printer knows "B" & "C" & "A" is dropped from the list)
At this point though "A" has been in the printer, the print no longer remembers it or retains the information that it was there.

Even if you have cartridges that were repeatedly refilled and the print heads no longer work, they should be usable for resetting purposes.
Read More..

How to solve Toner Sensor Error on Oki printers


After replacing your Toner or Drum you get this message: “Toner Sensor Error”.
This error appears on these printers: C3200n, C3520, C9200...

Solution:

Possible Cause #1: Toner cartridge may not be locked into the Drum properly or the Toner/Drum unit may not be locked into the printer correctly.
Resolution: Check the Toner cartridge Lock Lever (Figure 1) and make sure it is in the LOCKED position:


Possible Cause #2: Error may occur if the plastic Shutter / Flap on the side of the Toner cartridge is fully or partially down blocking the Toner Sensor window (C3000 Series printers).


Resolution: Move the Flap upward and out of the opening to allow for the Toner Sensor to become fully exposed prior to reinstalling the Toner and Drum combination. This is a simple, easy step you can perform. (Ref. Figure 2)
The safest way to move this shutter is either with a toothpick or something plastic. Do NOT use a paper clip or anything metal to move the shutter. A metal object may short out the sensor making the Toner cartridge useless.


Left: correct position -Right: incorrect position


Possible Cause #3: The Drum or Toner may be defective.


Resolution “A”:

Remove the Toner/Drum assembly (without touching the blue locking lever).
Look inside the printer to locate the sensor for the Toner/Drum assembly.
Blow canned air into the sensor to clear out any possible dust.
Wipe the sensor clean with an alcohol wipe.
Re-insert the Toner/Drum assembly into the printer.


Resolution “B”:

Swap the Toner/Drum assembly (without touching the blue locking lever) with another Toner/Drum assembly (if available).
If the Error stays with the Toner/Drum assembly, then you can assume the Toner/Drum is defective.
Normally you would start by replacing the Toner first. If that does not resolve it, then try replacing the Drum.

If the Error stays with the same location, then you can assume the Printer is defective.
Read More..

Wednesday, July 4, 2012

Standardization Epson Stylus Photo 1390

6-colour premium-grade A3+ size prints within the limit of your budget
Fall Costs with INKdividual™ Cartridges

* Cost-efficient INKdividual™ cartridges
* Perfect ink survival and fall expenses
* Succeed azygos cartridges when any coloring ink runs out
* Eliminates wastage of throwing forth an interracial cartridge with remaining ink in another flag

Allegro Quicken to Stay One Stair High

* Packer print-outs of up to 15ppm for emblazon and photograph
* 5 assorted droplet sizes with Innovative VSDT
* Portrays the most subtle ornament transitions
* Optimized ratio action

When Print Size Matters

* Eye-catching prints of up to A3+ BorderFree situation
* For beauteous designing proofs, impactful promotional materials, and exhibition-quality photographs
* Inexpensive 'colossal prints' versatility for moderate business outfits

Striking Seeable Reflexion

* Specially formulated New Photo Ink for the finest seeable prints
* Wider timber represent and slick finishing
* Saturated interpretation of black-and-white portraits, art and soothing landscapes
* Enter and save ikon prints for the endless statement
* Lasts up to 200* eld in exposure album store

Calibre that Makes a Difference

* Images are portrayed superbly up to 5760x1440 dpi
* Advanced Micro Piezo produce straits with VSDT engineering
* Extremum 1.5pl ink droplets for the smoothest quantification

Adobe RGB Resource for the Sensible Photographer

* Original Brick RGB work norm bleach
* Brilliant rationalise demo
* Accurately limn the wider gamut of images captured on pro
digital cameras
* Deep straddle of gloss output modes
* Indispensable for the lifelike professional, the concern someone,
or the ikon enthusiast

Restored PhotoEnhance for Perfect Photos

* Photograph perfect photos with no harry
* New improved EPSON PhotoEnhance™ Field
* Sound software psychotherapy to find best simulacrum settings
* Semiautomatic accommodation of stuff sportfishing, backlight and tegument atmosphere

Unforced Activity with EPSON Creativity Suite

* One-stop pic software root
* Neatly manage all your digital images
* Produce beautiful, high-quality photos easily with Unhurried Picture Indicant
* Supports more RAW person formats for professed needs
Read More..

Resettear For EPSON CX3700

Resettear For  EPSON CX3700
1. Exchange on printer
2. Run consort.BAT and persist the activity
3. run APSCX3800Series_Ver12.exe from the extracted folder
4. flick have
5. take the worthy analyze to epson cx3700 and destination to uero then plosive ok
6. go to upkeep then Superior act ink pad counter then utter ok
7. penetrate on "show button" exchequer its through then plosive on "initialization switch" then click on "finish add"
8. exchange off printer for 5secs then shift on again

After you correct succesfully, go approve in day.BAT windows and you can travel the fellow okay to rule
Read More..

HP Confirms LaserJet Printer Black Toner Shortage

HP on Tuesday confirmed that it's dealing with a shortage of replacement black toner cartridges for its low-end monochrome LaserJet P1102W and LaserJet M1212 printers. For the past several months, HP partners have been unable to procure the HP-branded CE285A black toner cartridge through distribution. Sources from several major distributors told CRN this week that the CE285A toner cartridge has been either backordered or available in very limited quantities
Read More..

BulletScan M40 Photo Scanner Scans and Uploads Photos, Business Cards

iVina announced that it has enabled its BulletScan M40 mobile scanner to scan and upload color photos, business cards and receipts to document and photo sharing sites without any PC by simply plugging in the pre-configured Eye-Fi card into the scanner’s USB port or SD Card slot. To add this valuable feature to the BulletScan M40, registered users may go to http://www.bulletscan.com, select the M40 product and click on downloads to update the M40 to the latest firmware at no charge. With this new innovative capability, users may scan quickly and easily their color photos and documents to over 25 of the most popular photo sharing and document sharing websites.
“Scan and send documents and photos up to 4” x 8” to such popular sites such as Costco.com, Evernote, facebook, Flikr, Picassa, Shutterfly, SnapFish and walmart.com without any PC required,” said Murray L. Dennis, president and CEO of iVina, Inc. “With almost ubiquitous access to Wi-Fi at airports, hotels, restaurants, Starbucks, corporate offices, personal residences and public facilities, the BulletScan M40 is becoming one of the most intelligent, easy-to-use, compact and cost-effective solutions for capturing, storing and sharing your most important photos, business contacts and receipts anywhere you go.”
The BulletScan M40 Photo Scanner is for the person who needs to quickly convert photos or paper files to digital files anywhere. Ideal for archiving family photos or reliving favorite memories, the BulletScan M40 helps bring favorite photos into the digital age where they can be easily stored, found, viewed and shared with others. Scanned images are automatically cropped and straightened without any software to install. Scan a 4” x 6” photo at 300dpi in color in under 7 seconds. Offering the ultimate in portability, the BulletScan M40 automatically scans photos directly to USB Flash drive, SD or MicroSD card – there is no PC required in order to capture photos, business cards and receipts digitally.
Read More..

HP Inkjet Web Presses Produced 1.46 Billion Pages in 2010

HP Inkjet Web presses produced 1.46 billion letter-size pages in the 2010 calendar year, printing for some of the world’s leading book manufacturing, print fulfillment and commercial printing businesses. 'Last year, HP Inkjet Web Presses set new, record levels for productivity, exceeding our expectations with flying colors,' said Aurelio Maruggi, vice president and general manager, Inkjet High-speed Production Solutions, HP. 'With more than 20 presses installed worldwide and new installations underway, a growing number of progressive companies are seeing the extraordinary value HP Inkjet Web Press technology offers.'
Read More..

Epson Brings Out Double-Sided SMB Inkjet

The new MFP is touted as being the world's fastest double-sided printing solution for small offices. There is also a non-MFP version. Amidst the January rush is the announcement from Epson of its WorkForce 840 multi-function printer, and the associated printer-only WorkForce 60. They offer a throughput of 15 ppm black and 9.3 ppm color single-sided; and 7.4 ppm black and 5.4 ppm color two-sided. The MFP can also do two-sided copying, scanning, and faxing.
Read More..

Manual HP LaserJet 3200/3200M Printer

http://www.printerworks.com/Images/3200_ds.jpgThe HP LaserJet 3200 set and HP LaserJet 3200M quantity are potent activity tools with the capabilities of a congested represent of state equipment. With the creation, you can:

* PrintPrint documents easily with the laser attribute you mortal
travel to judge from an HP LaserJet printer.
* FaxUse the fluid as a standalone fax machine to channelize and greet faxes, as asymptomatic as fulfil modern tasks specified as advancement faxes to other locations. Use the software to move faxes from and invite them to your computer.
* CopyMake crack laser-quality copies. You can variety up to 99 copies of a 30-page original. You can also magnify, slim, adapt differ, and collate.
* ScanScan heavy documents to create electronic files.
* Use software Use the software to print, fax, make, or ikon. Also use the software to store and prepare scanned documents.

download
Read More..

Reset Counter Epson RX600, RX620 and RX630 | Free Printer Resetter

Reset Counter Epson RX600, RX620 and RX630

Reset Counter Epson RX600, RX620 and RX630
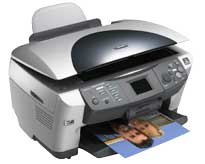
Resetting RX600, RX620 and RX630 using adjustment program and manual reset. Adjustment Program RX600, RX620 and RX630 work under win98, WinME, Win 2K and Windows XP. This adjustment does not require date setting.


Resetting Counter on Epson RX600, RX620 and RX630 Using this Adjustment Program

  • Run the software and Set the adjustment setting and equal to the printer, Click Ok
  • Click maintenante tab
  • Check waste ink pad counter then click reset to reset the counter.
Manual resetting Epson RX600, RX620 and RX630
  • Press all following buttons : Power, B&W, Color,
  • Then, on demand (you'll see message on printer screen), turn off printer.
Download Adjustment Program Epson RX600, RX6 2 0, RX630
Read More..

Error 0x61011beb on HP Officejet and Photosmart printers


Solution 1:

  • With the printer power on, disconnect the USB cable from the computer.
  • Remove the ink cartridges
  • Unplug the power cord. Wait for at least 1 minute. Plug the unit back in (press the power button if necessary)
  • Wait for the "Insert Cartridges" message. Reinstall the cartridges
  • Close the product doors
  • If you receive a recalibration message, allow the printer to complete this task
  • Reconnect the USB cable
  • Try your print job again


Solution 2:

  • Plug it directly into the wall, rather than into a UPS.

  • Verify that the unit is switched on. Disconnect the USB/Ethernet cable from the All-in-One and also disconnect power cable from All-in-One and also from wall outlet.

  • Wait 30 seconds.

  • Plug in the power cable to All-in-One and also to wall outlet.

  • Check for the functionality.


Solution 3:

  • Unplug the power cable from printer when the printer is powered on and wait for 20 seconds.

  • Then, press and hold # and 6 while plugging in the power cord.

  • Continue holding until it displays Semi Full Reset message in the front panel of the All-in-One


Read More..

How to reset waste ink pad on Canon Pixma MP210

Error 5b00 means the waste ink counter is full, you need to reset it.
Solution:

Step 1: Download PCM Service tool.

Step 2: Enter in service mode in order to used the re setter:
  • Turn off the printer without pulling the power cords.
  • Hold down Resume button and press Power button
  • Keep holding down Power button and let Resume button go
  • Then Press Resume button 5 times then let both buttons go
  • The Alternate Blinking error is gone, the printer is in Service Mode state
Step 3:

  • Extract the PCM servive tool resetter and then double click "servicetool.exe"
  • Click Reload Button and you will get a new USB port.
  • Load some papers in your printer and press the "Main" Button, wait until it shows "error 001" then press OK.
  • Then press "EEPROM" button and the printer will print some text, after that click OK
  • Then power off the printer (sometimes you have to press twice the power button to turn off) and turn on again.
Read More..

Tuesday, July 3, 2012

chuong trinh restart may ip1200

http://images.vatgia.com/pictures_120/small_qac1185523719.gifDownload Các Soft Reset Máy in Phun
here
Read More..

Epson TX200 Resetter Guide

Epson TX200 Resetter Guide
To download this resetter please read first the carefuly section, this is manual will help but we dont give any waranty justfree to try download here
Read More..

Canon S450 Printer Resetter

Canon S450 Printer Resetter
1. Power off printer
2. Hold Resume button then press and hold POWER, the beeper will sound once.
3. Hold POWER and release RESUME
4. Press RESUME twice
5. Release Power button
6. When the indicator lights steady, press RESUME 3 times. The indicator should be orange.
7. Press Power to set data

The Secret Resetter Code for Canon BJC-2000 BJC-2100 Serie

1. Remove the Cartridge
2. Unplug the AC Power Cord
3. Close Front access panel
4. Hold down the RESUME/RESET button and plug in the AC power cord
5. Release RESUME/RESET after plugging in the AC Power cord.
6. Press the RESUME/RESET once within 5 seconds and release the RESUME/RESET.
7. Press and HOLD RESUME/RESET for two seconds or more and release it.
8. Press and HOLD RESUME/RESET for two seconds or more and release it.
9. Unplug AC Power Cord to set data.
Read More..

canon ip 1980 Printer reset

canon ip 1980 Printer resetIf you make printers canon ip 1980 and crashing don,t be worried nigh it now you can travel this problem by self.In my posting i give justify to fix this problem bay using ip1980 resetter software.

1. matter cognition secure then closure in ac connector then discharge digit from force button
2. matter index button again to shift on printer
3. then artless iptool.exe
4. in correct counter hump 2 agenda ink counter and use ink tabulator
5. then in counter ink depression adjust negroid and reset kind
6. then in feed ink tabulator click main and platen
7. then switch off your printer
8. then control on the machine

now your feature been typical again
satisfy better this place to cultivate by utter adsense above and low
Read More..

RESETTER MP145 AND MP160

RESETTER MP145 AND MP160MP145 AND MP160

1. With the machine powered off but contiguous to a cause maker, press the Knowledge button time pressing and holding the Stop/ Reset fasten.
2. When the Powerfulness is lit, force the Stop/Reset button two times time imperative and retentive the State add.
3. When emotional the Noesis add and the Grab / Reset secure (disregardless of condition), the machine faculty act into a work way. (Waiting for agenda option)
4. When the on/off lights in viridity, pushing the Stop/Reset secure the specific merchandise of case(s) according to the serve recorded in the plateau beneath.(Each measure the Stop/Reset switch is pressed, the LED lights alternately in chromatic and chromatic, turn with citrus.)commentary: pressing 4 nowadays for act ink sideboard reset.

The enumerate of the Correct secure imperative LED Run Remarks
0 moment Gullible Nation off
1 time Orangeness Maintenance copy exposure
2 nowadays Chromatic EEPROM indicant
3 present Citrus EEPROM reset
4 times Chromatic Ravage ink counter adjust

5) Unplug telegram powerfulness. (for MP145 / MP150)
6) Transmit Off Knowledge. (for MP160)

CANON MP150
Succeeding is the process to reset the wate ink calculator for the Canon Pixma MP150

1. With the machine supercharged off but connected to a force thing, pushing the Quality switch spell pressing and holding the Stop/ Adjust button.
2. When the Country is lit, mould the Stop/Reset add two present patch pressing and retentive the Country fix.
3. When releasing the Commonwealth fix and the Place / Adjust button (regardless of arrangement), the printer give relocation into a writer modality. (Inactivity for menu selection)
4. When the on/off lights in viridity, pushing the Stop/Reset button the nominal find of time(s) according to the
part traded in the fare beneath.(Apiece period the Stop/Reset secure is pressed, the LED lights alternately in orange and chromatic, play with river.)commentary: pressing 4 present for feed ink sideboard adjust.

The symbol of the Reset secure imperative LED Usefulness Remarks
0 minute Unaged Index off
1 experience Chromatic Copulate ornamentation pic
2 times Naive EEPROM print
3 present Chromatic EEPROM correct
4 nowadays Unripe Devolve ink counter correct

5.urn off the machine.( it moldiness be appeal off)
then displace it on again.
Read More..

Ravine MP190 resetter download

Ravine MP190 resetter downloadSet Feed Ink inundated canon

1. Succeed Delivery MODE. By pressing Listing Reduplicate Ikon Repeat Copy
2. Select Essay Style.
3. Select [8] PRINTER Try in Run Fashion.
4. Superior 3. [EEPROM Sunshiny].
5. Select 0. [INK Rely].
6. Push the [Set] key.
7. Mold the [Stop/Reset] key (regressive to the suggest of
3)), and then pressure the [ON/OFF] key

After set manual now remained the reset permanenly using software resetter for canon.
Read More..

HP Takes ePrint Into The YouTube Comedy Club

Toner cartridges maker Hewlett-Packard will use its ePrint technology as part of a new live comedy event. The firm has announced HP ePrint Live, which it calls a "crowd-sourced live event and video series" that will be broadcast live on YouTube. Hosted by comic Rob Riggle, with actors from the famous UCB Theatre, viewers will be encouraged to send in ideas for jokes and improvisations via ePrint technology. The ideas sent in will be printed out from printers placed on stage, from which Riggle and the actors will perform skits live over the course of a two-hour show.
Read More..

Ink Refills Help You Save Big

Everyone knows that buying new, brand-name printer cartridges from the original equipment manufacturer can be expensive. But are third-party alternatives really a better deal? As PCWorld's Serial Refiller, I've set out to try third-party options--including remanufacturers, refill services, and do-it-yourself refill kits--and tell you whether the savings seem worth the hassle
Read More..

Launch of Oce TDS750 Offers CAD Customers Optimal Large Format Printer

Oce, a Canon Group company and an international leader in digital document management and delivery, today announced the launch of the Oce TDS750 large format printing system. The new Oce TDS750 printer offers architects and engineers a fast, easy and reliable solution for their large format print, copy and scan needs. Based on the multi-award winning Oce TDS700 printer, the Oce TDS750 provides a reliable, environmentally-friendly printing solution for departmental or print room environments.
Engineering departments can easily meet their challenging deadlines with the consistent print speed of 9 D-size prints per minute and no warm-up time for the Oce TDS750. Users can load the system with 6 media rolls and up to 3,900 ft. media capacity for long uninterrupted printing, making it ideal for productive central print rooms. With secure print job management features, customers can prioritize urgent jobs and quickly complete projects.
The Oce TDS750 was designed with the user in mind by making all aspects of the machine simple and intuitive, from media loading to defining scanner settings. Users spend less time trouble shooting and defining settings with the green button approach of the Oce TDS750. The advanced scan technology allows for the capture of color markups or as-builts and the streamlining of project collaboration. The result is faster turnaround times, less wasted materials and a more productive staff.
This exceptional new large format printer retains the solid radiant fusing technology with instant-on behavior and low noise, heat and ozone emissions as well as low energy consumption of the Oce TDS700. Businesses appreciate the sustainability aspects of this unique technology and the flexibility of placing it in departmental print settings without distracting employees.
Dependable output quality and performance
The Oce TDS750 600 x 1,200 dpi pico printing provides exceptional output quality – sharp fine details and smooth gray scales in renderings, 3D images and intricate graphics. Users have the peace of mind that document details are captured exactly as intended with no missing information.
Based on the Oce TDS700 with thousands of satisfied customers worldwide, Oce TDS750 users can count on dependable, high performance large format printing for years to come. With restricted controller access, safe data storage and system safe guards, the Oce TDS750 can also help provide a secure, productive print environment.
"For years, customers have been appreciating the quality, reliability, and support provided by Oce large format printers," said Erik van Eldik, Vice President Technical Document Systems Business Group at Oce. "We know our customers' workflows and are pleased to be able to evolve our core black & white technology to address the ever-changing needs of the technical document market place. The Oce TDS750 is an excellent large format system building upon the features that customers valued in the Oce TDS700 to further improve large format workflows while maintaining the flexibility to grow with their changing needs."
Read More..

Why the Epson Stylus™ T13

Why the Epson Stylus™ T13?
Epson Stylus™ T13 is your perfect and customised desktop printing partner.

Water, smudge and fade resistant prints with Epson DURABrite™ Ultra Ink
  • Epson DURABrite™ Ultra Ink, an all-purpose ink for everyday printing, delivers vibrant prints that last. Superior printing quality is now possible with this revolutionary smudge and water resistant ink.
Save more with Epson INKdividual™ Cartridges
  • Enjoy greater savings with Epson cost effective INKdivdual™ cartridges. You can now maximise usage of your ink cartridges when you replace only the empty cartridge.


Superior print speed for tight schedules

  • With a print speed of up to 28 pages per minute, you cut down significantly on waiting time. Printing has never been this efficient and easy.

Unsurpassed print quality
  • With a high resolution of 5760dpi, expect exceptionally high, photo-quality prints. In addition, it allows you to create and produce borderless photo prints for all your creative needs.

Achieve photo perfection with Epson Creativity Suite
  • Create professional and impressive photos and presentations with Epson’s dynamic, user-friendly photo editing and enhancement software, Epson Creativity Suite. You can now achieve photo perfection with the following functions:
    • Red Eye Correction
      Eliminate red eye effect and create professional photos instantly with just a click of a button.
    • Epson PhotoEnhance
      Deliver beautiful and natural photo prints by adjusting the skin tones, colour casts and exposure levels.
    • Epson Easy Photo Print
      Achieve photo lab quality prints in just 3 steps with this easy to use software.
Read More..

HP Printers Service Manual.pdf

http://www.databazaar.com/isroot/Stores/DataBazaar/SiteImages/Products/Hewlett-Packard/C4703A.jpgThis drill contains entropy for the rationalise HP DesignJet 2000CP, 2500CP, 2800CP, 3000CP, 3500CP and 3800CP printers. Throughout this Recitation, these printers will be referred to as the HP DesignJet CP Program Printers.

Concerning the component perspective, DesignJets 2800CP and 3800CP are basically DesignJets 2000CP and 3000CP (respectively) connected with an outer Hot RIP. Thence, all info practical to the DesignJets 2000CP/3000CP testament also be applicatory to DesignJets 2800CP/3800CP.

The procedures described in this recitation are to be performed by HP-certified assist personnel only. Move numbers for contriver options, accessories and writer parts are settled in chapter 7.
download manual here
Read More..

Reset the ink level for Canon MX308

Reset the ink level for Canon MX308Ravine MX308 (Canon MX300 periodical) was indicating low ink levels for mortal and ornament. If you bed refilled both of them, but You ease human a low ink naming or ( "blk ink vol unkown" and "clr ink vol unkown" on the machine select ).

Now, I conceive a resolution how to correct the ink raze for Ravine Mx308, vindicatory locomote these steps:

1. Disconnect the power cable
2. Connect it while holding down the power button
3. With the power button still down, press twice the “Cancel/Stop” red button
4. Release the power button
5. The printes turns into a kind of factory mode…(wait for about 10 seconds, utils it says “Idle”)
6. Press the “>” (next to the “OK” button) once.”Shipping Mode 3″
7. Press the “OK” button.
8. Press “OK” again for “Without cleaning”
9. A test page will print..
10. Open the cover, like you are about to change the cartridges.
11. Disconnect the power cable again.
12. Take out both cartridges.
13. Close the cover.
14. Connect the power cable once again.
15. Turn the printer on.
16. Now just put the cartridges back…
Read More..

Canon PIXMA MP560 Wireless Inkjet All-In-One Photo Printer

Canon PIXMA MP560 Wireless Inkjet All-In-One Photo Printerdead blends show and facility. Its built-in two-sided publication can book you wadding and ply the surround so you can be economic and eco-friendly all at the equal period. The new Automobile Exposure Fix II picture automatically adjusts and helps to precise your photos and you can prevue images before you indication on its built-in 2.0" LCD. Quality, quick right and superior the utility of your selection with the Gentle Holograph Helm. Making copies? No job. Multiple Colouration Gamut Processing Subject enables your copies to maintain the unity of the underivative. For the detector in you, Machine Icon Way automatically recognizes the typewrite of original you are scanning and saves it with

The Ravine PIXMA MP560 Inkjet Photo All-In-One Printer lets you easily pic from anywhere around the domiciliate enjoying unconvincing 9600 x 2400 maximum timber dpi1 with a minimum coloration droplet filler of 1pl and a 5 various ink tank system. So, you can exposure gorgeous borderless photos up to 8.5" x 11" or kinky, moral documents and revel unimagined calibre.

Machine Ikon Fix II Canon PIXMA MP560 is built-in engineering automatically categorizes your images into one of team types - Likeness, Scenery, Period Set, Snap with Scenery, and Exposure with Period Scene - then applies optimal human and multi-zone exposure chastisement. So, unexposed areas of the pic testament be optimized, region by expanse and faces that are backlit and under-exposed leave automatically be brightened with correct excuse form to helpfulness ensure statesman right tegument tones for gorgeous images.

Canon PIXMA MP560 Wireless Inkjet All-In-One Icon Printer key features:

* Enter it Green - Built-in 2-sided printing helps the surroundings and cuts your product usage by 50%
* Amazingly thick printer with both wireless and built-in 2-sided writing
* Maximum 9600 x 2400 decorate dpi2 for extraordinary pic dimension
* Use the new "Auto Pic Fix II" to automatically adjust and straight your photos
* Easily impress your photos from matched memory cards3 and USB Experience drives
Read More..

Filled a Canon Pg-31 Ink Cartridge

http://ecx.images-amazon.com/images/I/318Cj9114hL._SL500_AA280_.jpgCover your work surface with old newspapers or a drop cloth, and protect your hands with disposable gloves.

Remove the tape from the ink wells on the top of the expired cartridge with a box cutter or sharp knife. Drill into the small ink jet wells to widen entry using the drill provided in the refill kit.

Attach the provided needle to the ink injection syringe and insert into the magenta ink container. Draw 6 ml of ink into the syringe chamber.

Insert the needle into the magenta ink well; penetrate the sponge and stop. Do not puncture the bottom of the well with the needle; if you do, the ink cartridge will leak and must be discarded. Slowly inject the ink, stopping if the ink bubbles up to the top of the ink well.

Repeat Steps 3 and 4 for each color. The cyan color well is located on the bottom left side of the cartridge face, and the yellow color well is located on the bottom right side of the cartridge face.
Dab the cartridge with a paper towel or tissue to clean off any ink residue.

Apply a piece of tape across each of the ink wells to seal. Prick a tiny hole across the top of each well with a straight pin to vent.

Insert the cartridge into your printer, perform the clean utility and print as usual.
Read More..

how to Reset canon mx300

how to Reset canon mx300
1. Disconnect the power cable
2. Connect it while holding down the power button
3. With the power button still down, press twice the "Cancel/Stop" red button
4. Release the power button
5. The printes turns into a kind of factory mode...(wait for about 10 seconds, utils it says "Idle")
6. Press the ">" (next to the "OK" button) once."Shipping Mode 3"
7. Press the "OK" button.
8. Press "OK" again for "Without cleaning"
9. A test page will print..
10. Open the cover, like you are about to change the cartridges.
11. Disconnect the power cable again.
12. Take out both cartridges.
13. Close the cover.
14. Connect the power cable once again.
15. Turn the printer on.
16. Now just put the cartridges back.
Read More..

Resetter Epson T11 and Epson TX200

Resetter Epson T11 and Epson TX200Download fastening resetter epson T11 and resetter epson TX200, but I not proved this statement is validated or not. I get this entropy from many installation. epson T11 and Epson TX200 is one of the newest machine from Epson. This printer administer perfect wellborn for make and the machine contriver for Place and Diminutive Power. The resetter EPson T11 activity also on machine Epson T10.
download below
Read More..

Fixing Error Code 241 Paper Jam on Lexmark printers

Fixing Error Code 241 Paper Jam on Lexmark printers

Solution 1:


- Take tray out.
- Lift up so have access to bottom of printer.
- The 2 rubber rollers in the middle can be taken off
- Flip them inside out and put them back on and put tray back in.


Solution 2:
  1. Take out paper tray 1.
  2. Remove any jammed sheets of paper you find there.
  3. Once you have done this, reinstall the paper tray and try printing again.
  4. If the printer jams again with a 241 Paper Jam error message, look to see if it has tried to feed a sheet of paper out of the tray.   
    • If paper is not leaving the tray and no paper appears to be jammed anywhere in the printer, remove paper tray 1 once again. Make sure the paper is loaded correctly in the tray. With the tray removed, you can also check the feed/pick rollers. Do the following:
      1. Look into the printer where the tray goes.
      2. Look for two tan-colored rubber rollers (circled in green in the picture below). These are the rollers that grab and feed the paper up into the printer.


      3. Clean off the rollers with a dry cloth and try printing again.
      4. If the printer still will not pull any paper, your feed rollers may be worn. As a temporary fix, you can try flipping the rubber feed rollers inside out. Remove paper tray 1 again and carefully remove the rubber tire off each of the roller wheels. Then flip the rubber tire inside out and put it back on the wheel. 
      5. If either step 3 or 4 fixes the problem, your feed rollers are worn and will eventually need to be replaced. However, you should be able to continue to use the printer temporarily.
      6. If the paper still does not feed at all, the feed motor to tray 1 may not be feeding the paper. In this case, the printer will require service.

         
    • If paper is feeding out of the tray but getting jammed, you may be able to pinpoint the source of the problem by taking a close look at where the leading edge of the paper is stopped.  
      • If the paper is getting jammed right at tray 1, a small piece of paper may be stuck in one of the rollers at the front of the printer. Do the following:

         
      1. Remove paper tray 1.
      2. Look into the printer where the paper tray goes. Look upwards into the very front of that area. You should see a slot or guide where the paper will go once it is fed out of the tray. Towards the left-hand side, there is a set of feed rollers. A small piece of paper can get wrapped around one of the rollers here.
      3. If you see a small piece of paper stuck in one of these rollers, try to remove it.
      4. If you cannot reach it or it cannot be removed, the assistance of a service technician will probably be needed.


        Note:
          To complete steps 1-3 above, it may help to lay the printer on its side. If you do this, please use caution when lifting the printer. Remove the toner cartridge and the paper tray before setting the printer on its side. Also make sure the printer is powered off and unplug any and all cords, especially the power cord, going into the printer. Refer to the photos below for guidance on where to look into the printer for the feed rollers. The rollers are located in the area of the printer highlighted by the yellow circles.


      • If the paper is getting past the front of the printer and jamming elsewhere with a 241 Paper Jam error, do the following:
      1. Look for any obstructions at the leading edge of where the paper is jamming.
      2. If you are not able to find (and remove) any obstruction, the printer will probably need service to isolate the problem and replace the failing component.

         
  • Another way you can find out if your printer will require service for this issue is to obtain the secondary codes for the paper jam error. To do this: 
    1. As soon as you receive the 241 Paper Jam error message, press and hold the Return button.
    2. While holding down the Return button, press the Select button. Two lines of numbers will appear on the printer screen. These are the secondary codes.
    3. If the top line of the secondary code is 8E XX 06 X1 (where X can be any letter or number), the problem could be with the pick motor for tray 1. This will probably result in the printer needing service.
  • If you continue to receive the jamming error after checking all of these possibilities, the printer may require service.
Read More..

Message Error call service 7980 on Kyocera printers


Cause

  •  Waste toner tank overflow
  • If the bottle is not full then the sensor thinks it is


Solution:

  • Clean the sensor
  • Replace waste toner tank
Read More..

Fixing error code 0xb9000009165, 0xb9000009 on HP printers


Message looks like:

Error 0xb9000009 165hw interrupt hwv2.c is
Problem with the HP printer

Solution 1:


- Uninstall all the HP drives and software
- Unplugg the USB cable from the printer
- Unplugged power supply from the outlet and printer
- Plugg the USB back in to printer

- Unplugg the power supply from the power module.
- Plugg the power supply cord to module
- Plugg the power supply in to outlet
- Plug the power module connector to printer.


Solution 2:
- Unplugg the power and usb cable from the printer
- Download and install the lastest drivers and software for the printer
- Plugg the power and then the USB.
Read More..